
Gutenberg is coming in WordPress.
Yes, it will be rolled into WordPress 5.0, which doesn’t have a release date yet, but it’ll likely become sometime in the summer. And in developer time, that’s not really long at all.
Gutenberg is really going to change the way people use WordPress. One of the biggest impacts is going to be on shortcodes. Technically, they will still work once 5.0 comes around, but the TinyMCE editor where developers would place buttons for them won’t be around anymore.
Instead, it’s probably going to be the best to simply roll any shortcode into it’s own block. And it’s honestly not as hard as you might think, especially with the dynamic block type in Gutenberg.
In March, I converted all of the shortcodes in Sports Bench into dynamic blocks. It was daunting at first, but by the time I finished, I felt extremely confident in creating dynamic blocks.
So, using the team block from Sports Bench as a guide, here’s how to create a dynamic block to replace a shortcode.
Acknowledgement
First off, I do want to mention that a lot of the code that you’ll see in this guide come from Zac Gordon’s course on developing Gutenberg blocks. I took the course earlier this year and it’s been extremely helpful. While this tutorial is only on dynamic blocks, if you want to fully learn Gutenberg and how to develop with it, I highly recommend taking his course. It’s $79, but it’s more than worth the price.
Setting up development of the block
So before we do anything we need to set up our plugin or theme to actually develop the block. Our code is going to reside in a couple of places. First, it’s probably a good idea to create a separate PHP file to load the JavaScript and CSS for the block and essentially create the block. More on that later.
Next, we need a package.json file with the following dependencies:
"babel-core": "^6.25.0",
"babel-eslint": "^8.1.2",
"babel-loader": "^7.1.1",
"babel-plugin-transform-object-rest-spread": "^6.26.0",
"babel-plugin-transform-react-jsx": "^6.24.1",
"babel-plugin-transform-runtime": "^6.23.0",
"babel-preset-env": "^1.6.1",
"browser-sync": "^2.18.13",
"browser-sync-webpack-plugin": "^1.2.0",
"classnames": "^2.2.5",
"cross-env": "^5.1.1",
"css-loader": "^0.28.7",
"eslint": "^4.14.0",
"eslint-config-prettier": "^2.9.0",
"eslint-config-wordpress": "^2.0.0",
"eslint-plugin-prettier": "^2.4.0",
"extract-text-webpack-plugin": "^3.0.2",
"node-sass": "^4.7.2",
"postcss-loader": "^2.0.9",
"raw-loader": "^0.5.1",
"sass-loader": "^6.0.6",
"style-loader": "^0.19.1",
"webpack": "^3.10.0",
"cgb-scripts": "1.9.2",
"create-react-class": "^15.6.2",
"react": "^16.2.0",
"react-dom": "^16.2.0",
Because we’re using Gordon’s example of a block, we’re going to need to compile the code before it’s really usable since it’ll be React based. So we’ll need a webpack.config.js file with the following content.
https://gist.github.com/ViewFromTheBox/7f86acdc5f920312662ebb50a0b13de1
Next, create a blocks directory inside your plugin. Then create an index.js file inside of that. This file will simply have import ‘./{block-folder-name}’;. So for the teams block, it’s import ‘./team’;. Then create a folder for the block.
This block directory can have an editor.scss file, icon.js file if you want for the icon of the block, index.js where all the important code will go, and style.css for the styling on the front end.
Now we’re ready to start developing.
Adding the PHP for the block
Before we do any JavaScript work, I want to go ahead and just go through the PHP for the block, since that’s going to be the easiest part of the process.
First off, I recommend keeping all of your code for the block or blocks inside a separate PHP file from your main plugin or theme functions file. This keeps the code from being too cluttered. And for the time being you’ll probably want to wrap up the code in a conditional to check for the Gutenberg plugin or if the site is using WordPress 5.0 like this.
global $wp_version;
if ( is_plugin_active('gutenberg/gutenberg.php') || version_compare( $wp_version, '5.0', '>=' ) ) {
  include_once( SPORTS_BENCH_PATH . 'blocks/sports-bench-blocks.php' );
}
Next we need to call in the JavaScript and CSS for the Gutenberg block(s). We do this with the typical wp_enqueue_script and wp_enqueue_style functions. The one caveat is that you have to define the correct dependencies. For the JavaScript side, that’s wp-i18n, wp-element, wp-blocks, wp-components and wp-api. So your code at this point probably looks like this.
https://gist.github.com/ViewFromTheBox/9715e555a46be1c65584e86e129df865
I also want to note that you’ll probably need to localize the JavaScript file so that we can the get the REST url and pass through the REST API nonce to load post data if that’s needed. You can do that like this.
https://gist.github.com/ViewFromTheBox/2d13071d1960ff47700832a56f839403
Finally, we need to add in the code that displays the block in the post. This comes in two parts. First we use the register_block_type function to register the block and then add a callback function.
register_block_type( 'sportsbench/team', [
  'render_callback' => 'sports_bench_render_team',
] );
And then we create the callback function. This is where we add the PHP that will actually render the block on the front end. You callback function must have the $attributes variable as a parameter. This works basically the same as the $atts variable used for shortcodes.
So my callback function to get a team and display it looks like this.
https://gist.github.com/ViewFromTheBox/d08a959fd8a8aba40207baee1883451e
Creating the actual block
Now let’s create the block in the Gutenberg editor.
At this point, you really do some reading on the basics of developing a Gutenberg block. You should have a grasp of the baseline code — how to register it in the JavaScript, how to add the name of the block and the edit and save methods. You can head over to Ahmad Awais’ Gutenberg boiler plate to familiarize yourself with the structure of blocks or just take Gordon’s course.
Now, after you add in the title, icon, category and keywords, you can add in attributes to the block. These are the attributes you can pull in the PHP like we talked about before. Obviously, these will be different for your block and shortcode, but for the team, these are the attributes I have.
Next, in the edit method, we need to make sure we have the attributes and setAttributes as parameters for the method. Then we pull out the attributes from the attributes variable like this.
const { getTeam, hasTeam, team_id, team_string, teams } = attributes;
Now, here’s where things get very interesting. I’m using React Select to grab the teams from the database and display them in a select dropdown. For the sake of brevity, I won’t go into too much detail on how to use React Select for this, but you can view the full team block code and the team select code.
Anyway, there are two key things remaining. First, we need to create a function that will set the attribute or attributes when an input is changed. Inside this function, all you need to do is call the setAttributes function and then set the values for the attributes.
https://gist.github.com/ViewFromTheBox/d0b5f9d5042093985aaab9c513dfe16e
Next, we need to create the field or fields to display them so the user can change them to change the block. What I’ve done is create the select element as a variable. You can use select, text input or any of the other usual fields that you use in normal HTML. Just make sure that the value is set to the whatever your value attribute is and that the onChange value is the onChange function we defined earlier.
Here’s an example of a normal text input field you can use.
<input
    id={ id }
    type="number"
    value={ value }
    onChange={ OnChangeFunction }
/>
Now, I’ve discovered that the best place to put these options is in the Inspector Controls on the right-hand column. This is where you see “Document” and “Block”. Everything fits nice and neat in that column.
So to do that, we create a control constant and make that value an Inspector Control component like this.
const controls = focus && (
    <InspectorControls key="inspector">
        <div class="blocks-base-control">
            <label class="blocks-base-control_label">{__('Select a Team')}</label>
            { selectTeam }
        </div>
    </InspectorControls>
);
Finally, we return that and we’ll add some text to let the user know where they can go to edit this block.
return [
controls,
<div className={className}>
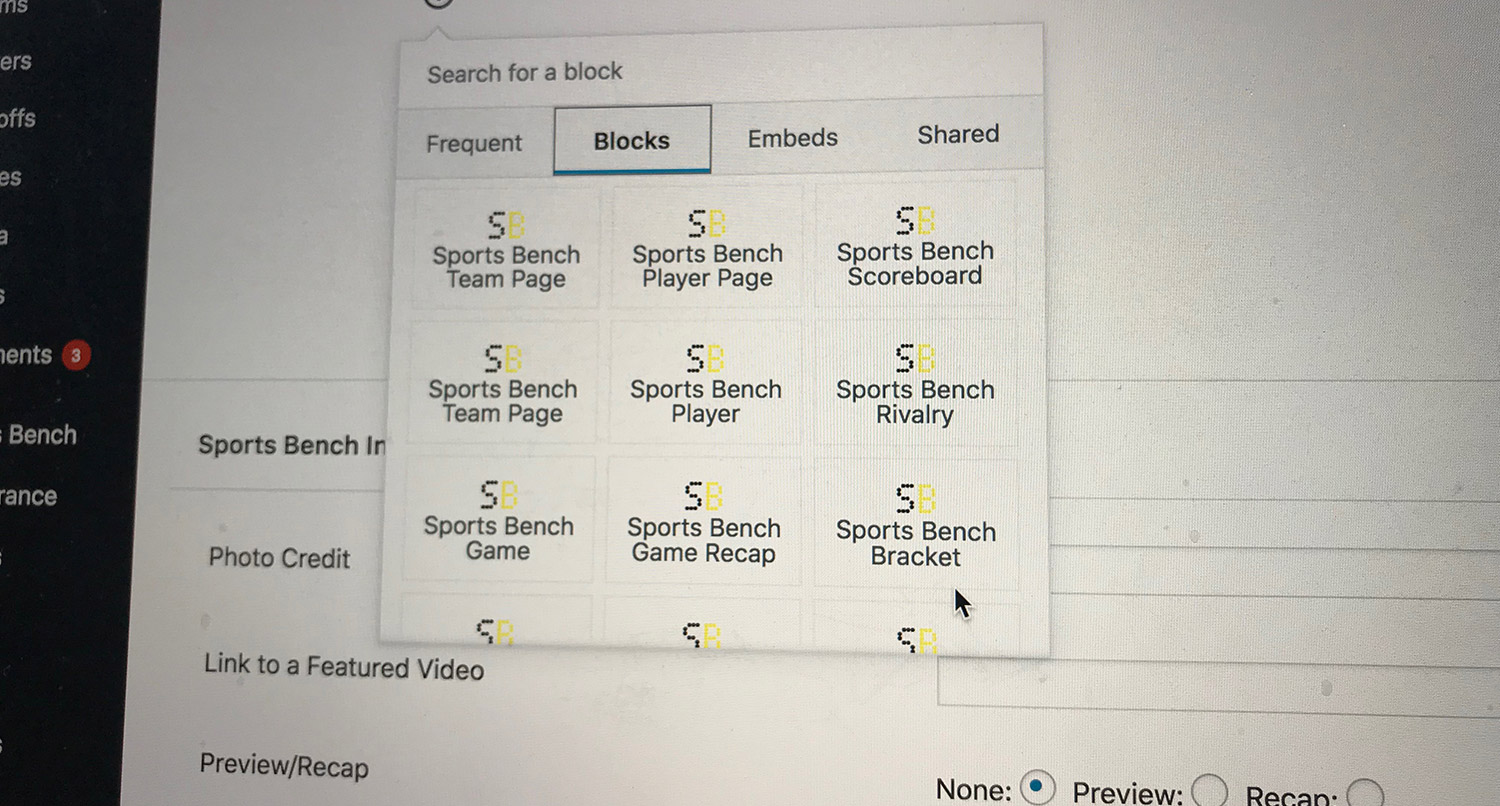
<h2>{__('Sports Bench Team Page')}</h2>
<p>{__('The team page block isn\'t editable. You can select the team to show in the block attributes in the right-hand column.')}</p>
</div>
];
Finally, we don’t need need anything in the save method, so we just return null there.
And now we have successfully changed our shortcode into a Gutenberg block that the user can now use. It’s a challenge the first time you do that. It’s not all that fun. But once you go through the process and know what to change and what does what, it gets easier and quicker and a lot more fun.
So developers, get to developing with Gutenberg. It’s coming and if you get left behind, it’s going to be really hard to catch up.


2 responses to “Changing a shortcode to a dynamic Gutenberg block”
Many thanks for the “Changing a shortcode to a dynamic Gutenberg block” blog.
It isn’t always clear which snippet of code goes into what file, or where that file is located.
Could you be so kind as to publish a ZIP file with the full code structured into position?
Thanks, Martin.
Hey Martin,
Below is a link to a repo that’s for a course where I learned how to create Gutenberg blocks. The repo is a good help, but I highly recommend purchasing the course to get a deeper understanding about how it all works.
Repo: https://github.com/zgordon/gutenberg-course