Gutenberg blocks are fun for the most part. But creating them can be quite the challenge, especially if advanced JavaScript and JSX aren’t exactly your strong suits.
But there’s a change coming on the horizon. And it’s in the form of Advanced Custom Fields.
Though currently in beta testing, ACF will be adding the ability to create custom Gutenberg blocks. I’ve been using it to create some blocks for this website and it has been hands down the best development experience.
The blocks feature will be available in both the ACF and ACF Pro version 5.8; however, in order to use it right now you must have a license for ACF Pro to download the latest beta version of 5.8 and install it manually on your website. So if that applies to you, go ahead and do it now.
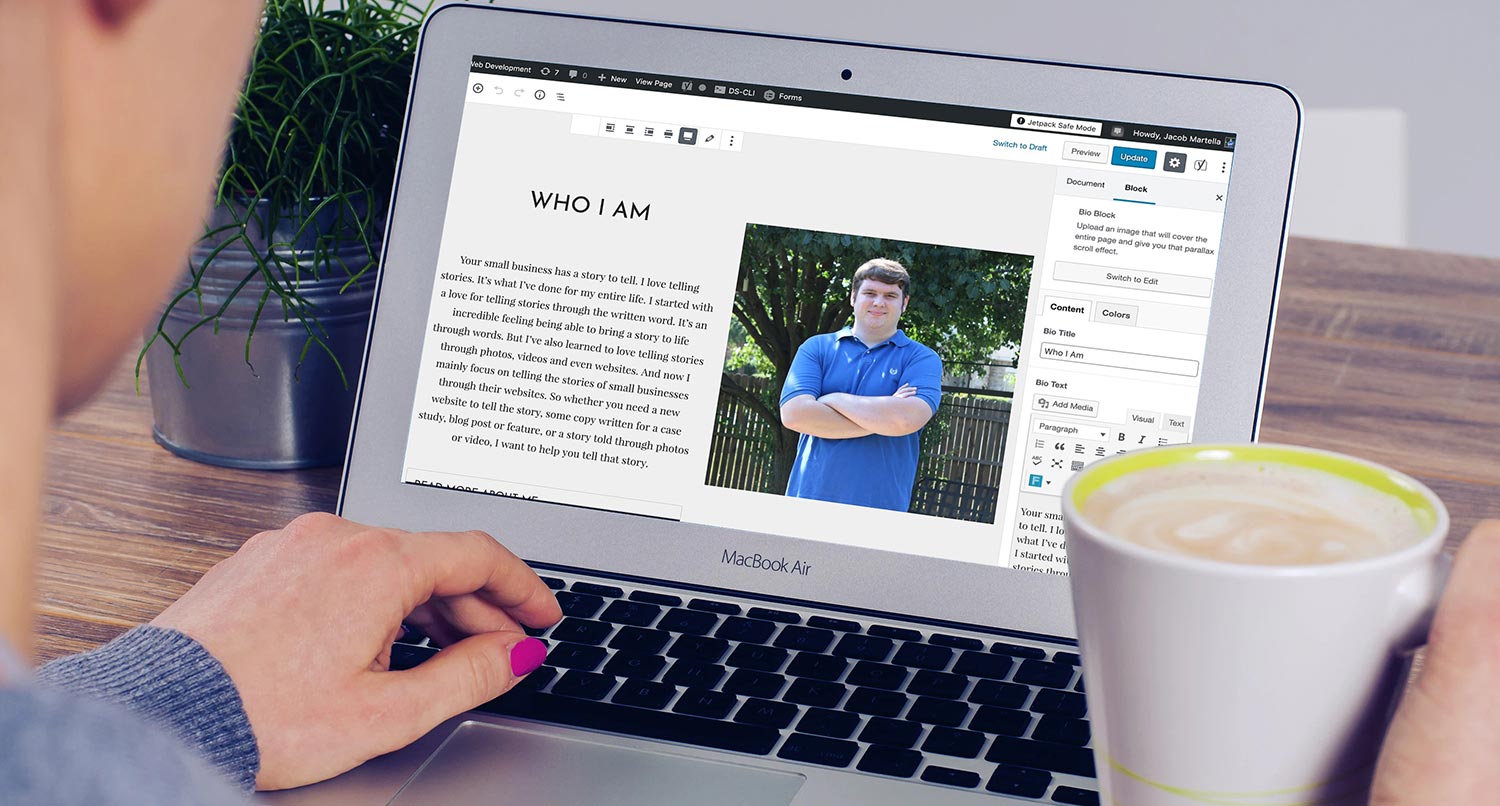
Once you’ve done that, let’s walk through how to create an ACF Gutenberg block. We’ll be creating a simple text and photo block similar to the second section on my homepage.
Just a note: all of this code should go in a custom functionality plugin or your theme’s or child theme’s functions.php file.
Now let’s get started.
Registering the block
The first thing we need to do is register the block so that the editor and ACF know that this block exists.
The process is fairly similar to registering a new block through JavaScript, except that we’ll use PHP and the acf_register_block function. This function accepts an array of arguments similar to the register_block call in JavaScript. But if you’re unfamilar with that function, let’s go over the args to use.
- name — the hyphenated slug for the block. The editor code under the hood uses this, but it’s particularly useful to you if you need check if the block is in a post or page.
- title — the title of the block. This shows on the front end when you’re selecting the block in the editor and the ACF field editor.
- description — a brief description of the block. This shows in the sidebar when the block is selected in the editor.
- render_callback — the name of the function that we’ll use to the create the layout of the block.
- category — the category for the block. Typically you’ll use ‘common’, ‘widget’ or ‘layout’, but you can also use a custom category that you’ve created.
- icon — the name of the WordPress dashicon or SVG string for the icon to show with the block in the editor.
- keywords — an array of up to three keywords to make the block searchable.
So for our example block, we’ll place this call to the acf_register_block function into our PHP.
function jm_add_acf_custom_blocks() {
  // register a bio block
  acf_register_block(array(
      'name'              => 'bio-block',
      'title'             => ('Bio Block'),
      'description'       => ('Upload an image that will cover the entire page and give you that parallax scroll effect.'),
      'render_callback'   => 'jm_bio_block_render_callback',
      'category'          => 'jm-page-layout-blocks',
      'icon'              => $jm_icon,
      'keywords'          => array( 'employer' ),
  ));
}
add_action( 'acf/init', 'jm_add_acf_custom_blocks' );
Now we need to add the fields to our site before we can really create the block.
Creating the fields
Once the block has been registered, we need to add in the fields for the block to use.
The good news is that this process is the same as when you’re creating regular ACF fields. The only difference is that we need to make sure that the control on where the fields are shown is set to “block” is equal to our block name.
So our fields page for these fields should look like this.

Now let’s create the block.
Creating the block
If you’ve developed with ACF before, then creating the block really shouldn’t be too difficult.
We first need to create the callback function from earlier to wrap our block code.
function jm_bio_block_render_callback( $block ) {
    //* Write code here
}
Then we create the element, call in our fields like would in normal PHP with normal fields. And then if have fields that change styling, like colors, widths, padding, etc., we’ll either add that through an internal stylesheet (<style type="text/css"></style>) or inline styles (<div style=""></div>).
So our code for this text and photo block should look like this.
function jm_bio_block_render_callback( $block ) { ?>
   <?php $block_id = 'bio-' . $block[ 'id' ]; ?>
   <?php $align_class = $block['align'] ? 'align' . $block['align'] : ''; ?>

   <?php
   $bio_image_id = get_field( 'bio_image' );
   $bio_image = wp_get_attachment_image( $bio_image_id, 'full', false, array( 'itemprop' => 'image' ) );
   ?>

   <style type="text/css">
      <?php echo '#' . $block_id; ?>.jm-bio-block p {
         color: <?php the_field( 'bio_text_color' ); ?>
      }
   </style>

   <section id="<?php echo $block_id; ?>" class="jm-bio-block <?php echo $align_class; ?> " style="background-color: <?php the_field( 'bio_background_color' ); ?>">
      <div class="row align-middle">
         <div class="large-6 medium-12 small-12 columns bio-text">
            <h3 class="bio-title" style="color: <?php the_field( 'bio_title_color' ); ?>"><?php the_field( 'bio_title' ); ?></h3>
            <?php echo apply_filters( 'the_content', get_field( 'bio_text' ) ) ?>
            <a href="<?php the_field( 'bio_link' ); ?>" class="button <?php the_field( 'bio_link_color' ); ?>"><span><?php the_field( 'bio_link_label' ); ?></span></a>
            </div>

         <div class="large-6 medium-12 small-12 columns bio-photo">
            <?php echo $bio_image; ?>
         </div>
      </div>
   </section>
<?php }
Now all that’s left is to style the block.
Styling the block
Finally, the last thing for us to do is to style the block from an external stylesheet. Again, this is similar to any web development you’ve done prior to this (and afterwards).
The styles for the block for the front end can go through your regular stylesheet, like style.css or another css file. But if you want the styles to show up in the preview on the backend, then you’ll need to create a stylesheet and enqueue it with the enqueue_block_editor_assets action hook.
function jm_enqueue_front_end_assets() {
    $editorStylePath = 'css/blocks.editor.css';
        wp_enqueue_style(
           'jm-portfolio-custom-blocks-css',
           plugins_url( $style_path, __FILE__ ),
           array(),
           filemtime( plugin_dir_path( __FILE__ ) . 'css/blocks.editor.css' )
    );
}
add_action( 'enqueue_block_editor_assets', 'jm_portfolio_add_scripts' );
Then go to town on styling it. Here’s my styling for the example block using SCSS.
.jm-bio-block {
  padding: 100px 0;
  .row {
    position: relative;
    max-width: 75rem !important;
    margin-left: auto !important;
    margin-right: auto !important;
    .bio-text {
      background-color: $off-white;
      color: $off-black;
      display: flex;
      flex-direction: column;
      align-items: center;
      justify-content: center;
      .bio-title {
        @include josefin(40px, $dark-blue, 300, uppercase);
        margin-bottom: 50px;
      }
      p {
        font-size: 18px;
        color: $off-black;
        margin-bottom: 50px;
        text-align: center;
      }
      .button {
        width: 100%;
        max-width: 480px;
      }
    }
  }
}

@include breakpoint(medium down) {
  .jm-bio-block {
    padding: 50px 0;
    .row {
      position: relative;
      .bio-text {
        position: relative;
      }
      .bio-photo {
        text-align: center;
        img {
          width: 50%;
          height: auto;
        }
      }
    }
  }
}

@include breakpoint(small down) {
  .jm-bio-block {
    padding: 30px 0;
    .row {
      .bio-text {
        .bio-title {
          font-size: 30px;
          margin-bottom: 20px;
        }
        p {
          font-size: 16px;
        }
      }
      .bio-photo {
        img {
          width: 100%;
          height: auto;
        }
      }
    }
  }
}
And that’s it. We now have a reusable, dynamic Gutenberg block and we didn’t have to write a single line of code. It’s things like this that are going to make the editor so much better than the classic editor once it and everyone else is up to speed.

So go forth and create blocks. It’s fun, I promise.