Google Search Console is an incredibly powerful tool in your analytics tool belt, especially when it comes to tracking your SEO efforts.
While Google Analytics allows you to see what people are doing on your website, it has a blind spot when it comes to search traffic that’s coming to your website. And that’s where Google Search Console comes into play. It allows you to see what searches your web pages are showing up, how many views and clicks you get from those searches, where your pages rank in those searches and so much more.
I wrote about what Search Console is in more detail and why a while ago. So today we’re going to take a deeper dive into your Google Search Console account once you have it set up and get logged in. That way you can get to the bottom of how people are finding your website and determining how your SEO efforts are going.
Google Search Console Dashboard
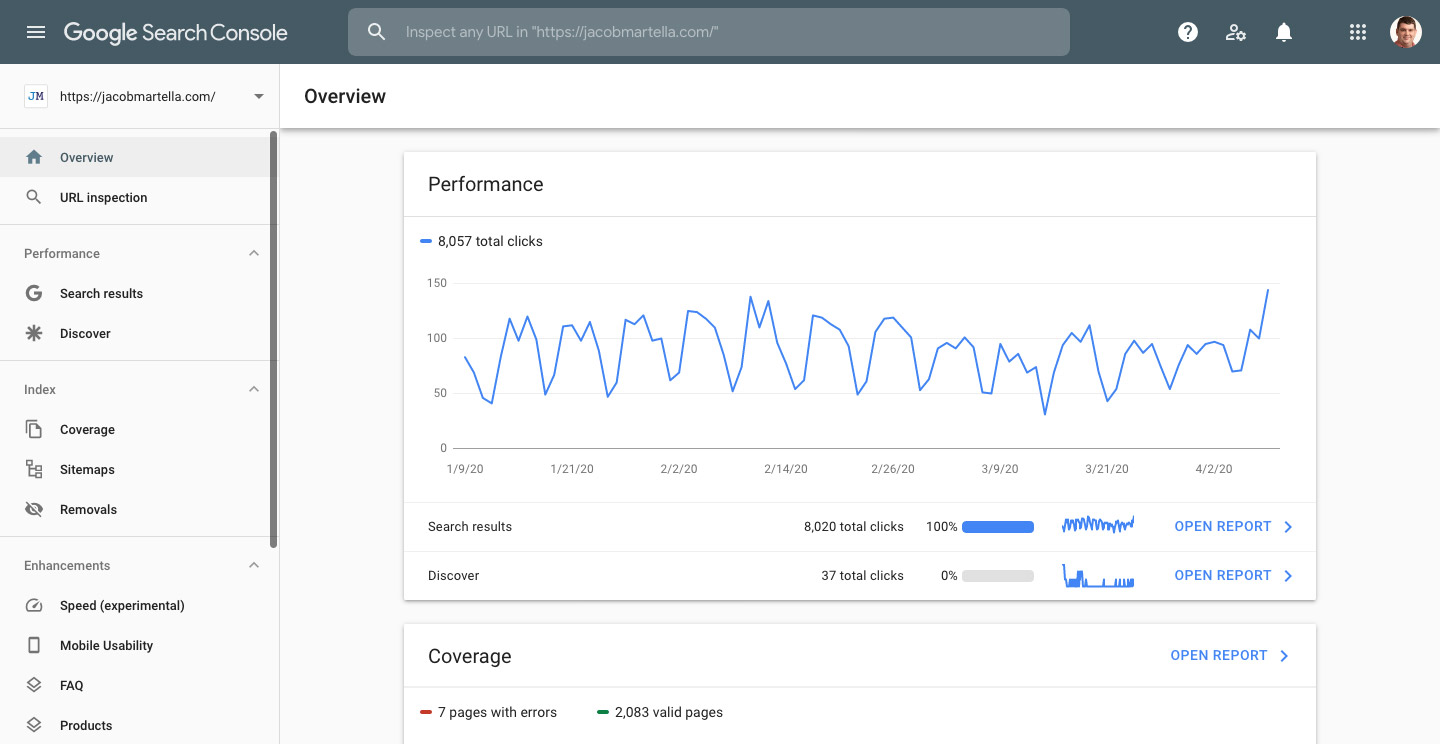
When you first log into your Google Search Console account, it can be a bit overwhelming and tricky to figure out where to start. On the left, obviously, is the menu to navigate to the many beneficial screens. And there is a lot to explore over there, which we will get to.
In the main section, you first see your performance statistics. We’ll get to the part where we go into more detail about this in the next section, but this spot gives you a basic overview of the performance of your website in the search results. If the overall trend of your graph is up, you’re doing something right.
Below that you can get an overview of the number of indexing issues on your website which could be causing problems with your search results and rankings. Finally, the last thing on the page is an overview of the different enhancements in Google Search Console. Again, we’ll get into these things in more detail later, but these help you find problems with mobile display, page speed and special Schema.
Seeing search result statistics
So the meat of everything in Google Search Console is seeing your website’s performance in searches. And you can definitely see a lot of data. From the queries your showing up in, to the countries, to the number of times you’ve appeared and people have clicked on your result, there’s a lot to digest here.
To get to your search performance, click “Search results” in the left-hand menu underneath “Performance”. As a default, the graph that appears is showing the number of impressions and number of clicks to your website over the last three months. And the table underneath breaks it out into the different queries your website is appearing in.
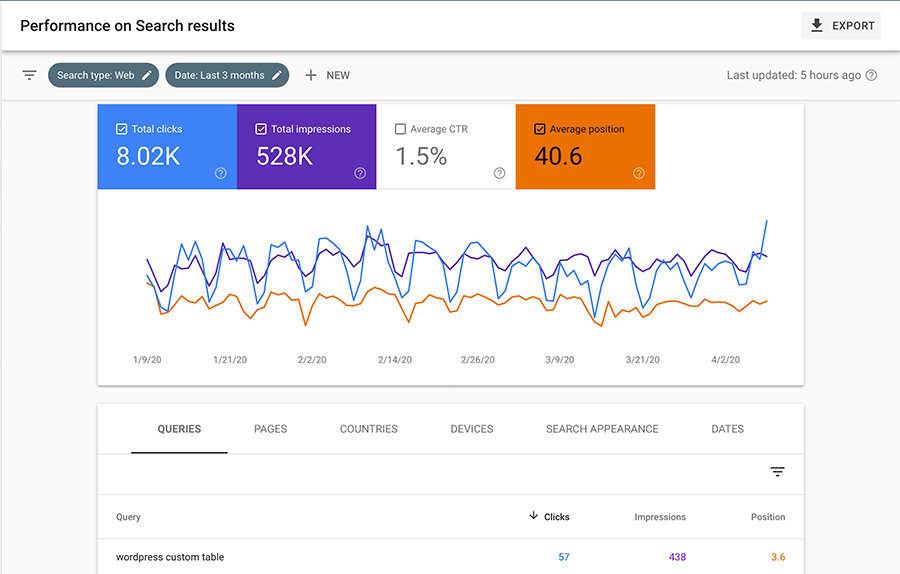
And that’s great and all as a default, but the real fun is filtering out the results and finding hidden gems. So for starters, I like to add in the average position by hitting that at the top of the graph. This way I can see just how high my pages are ranking so I can figure out if I need to work on the page rank part of SEO.
Next, I like to change the table at the bottom to sort by pages to see how things are looking at the page level. Then I click through the page and then sort by queries to see what searches that specific pages are appearing in and how high they are ranking. And I like to do that for all of my landing pages and a select number of blog posts to see if there’s anything I might need to change.
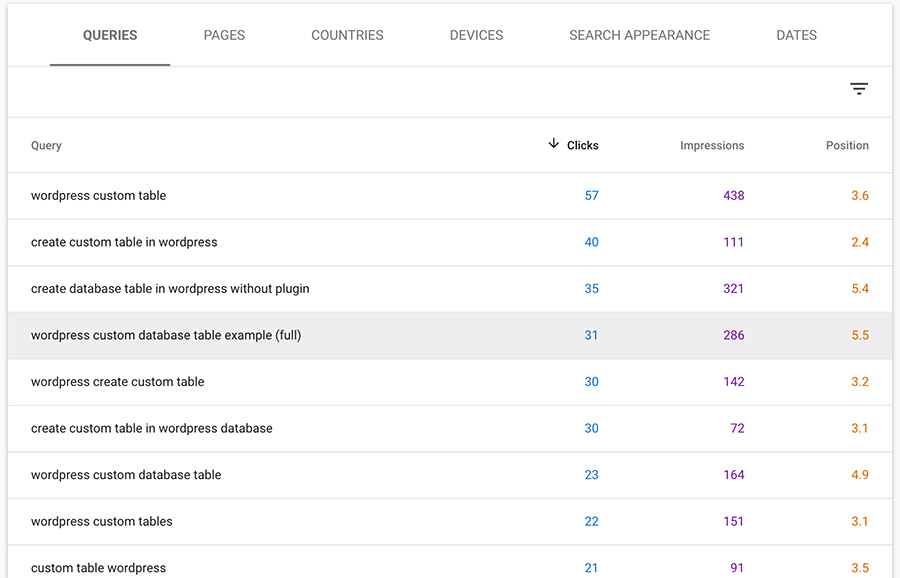
And as I said, there is a lot of information here. It’s well worth the time to play around with it to see what stats are important to you and what you want to track over time.
What is Discover?
There’s also a section on Discover, which is a relatively new feature that shows mobile user content they might be interested in based on their searches. I haven’t looked into it much, but you can see your results here underneath “Discover”.
Let’s Get Your Analytics Set Up
Your website needs web hosting and if you’ve made it this far, you probably want Google Analytics and Search Console set up on your website. So why not get both for the price of one. Sign up for the Performance WordPress Website Care plan and get custom Analytics reporting and Search Console set up without you having to lift a finger. Plus, you get quality web hosting, managed WordPress updates, security and so much more. It’s web hosting that actively works for your website!
Start Tracking Your Analytics Today!Submitting your sitemap in Google Search Console
One of the best features in Google Search Console is the ability to submit your sitemap(s) directly to Google itself.
Sitemaps are considered the best way to get Google to index your website and therefore start showing it in search results. Without submitting a sitemap, your website will get crawled eventually once somebody links to it and the crawlers get to that link. But by submitting a sitemap you can speed up that process and start ranking right away. Plus, the pages in that sitemap show Google what your most important pages are on the website.
To submit a sitemap, click “Sitemaps” in the left-hand column. You’ll see a list of sitemaps you’ve submitted before and their status. And at the top of the page, you’ll see a place to enter in the URL to the sitemap you want to submit. Fill it in and hit submit and you’re done. While the indexing won’t happen right away, your sitemap is in the system and will get indexed by crawlers and start showing in search results soon.
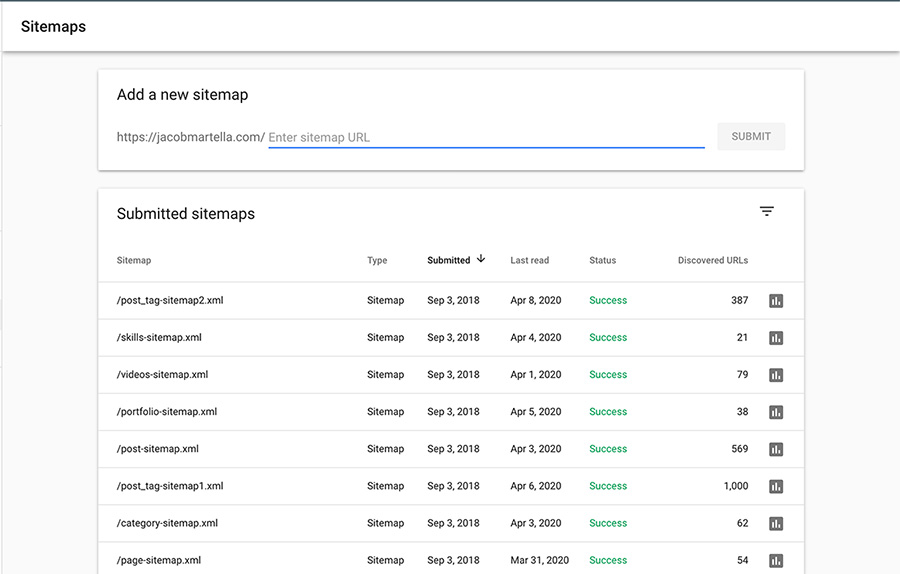
Plus, if you want Google to index a new web page or reindex a page you’ve just changed, you can also do that from Google Search Console. Simply paste the URL for the page in the top text box that says “Test and URL from” and hit enter.
From there, you’ll be taken to a screen that will display information about the latest crawl of the page and a place to request indexing from Google. Just as a heads up, the index will not happen instantaneously but as Google’s crawlers get around to it. But I’ve found that at most it takes a couple of hours for the indexing to be completed.
Checking for errors
Along those same lines, Google Search Console allows you to see errors you might have with your web pages as far as indexing is concerned. As the crawlers go through and index your website, they’ll note different errors that they come across, such as 404 errors, noindex problems, server (500) errors and the like.
While these are probably not probably not something your users are going to see on their screen, indexing errors can cause problems with your SEO. If Google and other search engines aren’t able to correctly index your website, you’re not going to end up with as high of a ranking as you should. And that leads to missed traffic.
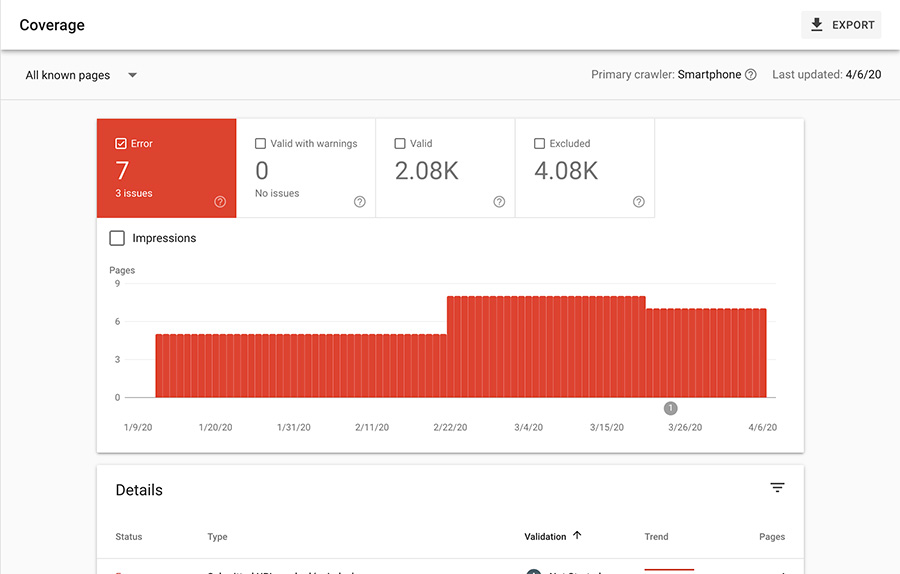
To view these errors, simply click the “Coverage” item in the left-hand menu. On the ensuing screen, you’ll see a graph with the number of errors over time. You can also choose to show other metrics in that graph, like valid pages, excluded pages and pages with only warnings.
Below that, however, is where you’ll find the best information. Here Search Console will show you what the specific errors are. And by clicking on each error, you can see what pages the error is showing on so you can go through and fix them. And once you’ve fixed them, you can tell Search Console to look over them again to make sure it’s correct.
Indexing errors are something that are easy to overlook. But you definitely should check this area at least every couple of weeks.
Removing pages from the index via Google Search Console
Also, another good thing you can do inside your Google Search Console account is to remove pages from the index.
You could need this for any number of reasons. Maybe a page has been removed from your website recently and you don’t want it to appear in search results. Or maybe you’ve created a new page that covers the same information and is more important than this other page and you don’t want them competing with each other in the rankings.
Whatever the case may be, removing pages from the index is fairly straightforward. You’ll click the “Removals” menu item underneath “Index”. From there, if you need to only temporarily remove a page from the index, you can select “Temporary Removals”. Next, hit “New Request” and then paste the URL you want to temporarily remove and hit next. URLs listed here will be removed for six months.
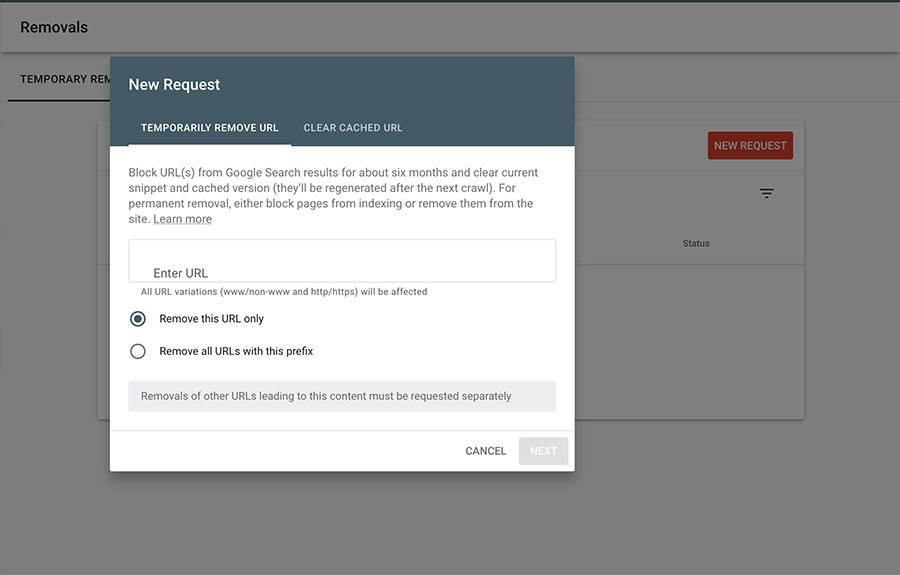
If you need to permanently remove a page from the index, select the “Outdated Content” tab, then hit the question mark icon next to “Submitted Requests” and click the link that appears. From there, paste in the URL to remove and hit “Request Removal”. Once it goes through, that page will no longer appear in the results.
You should have very good reasons for removing pages from the index since it can affect your website’s rankings. But if you need to do it, at least Google makes it pretty straightforward to do so.
Get Insights on How to do a Small Business Website Right!
Are you looking to get some help with your small business’ website, but aren’t quite in a spot to take that next step? No worries! I’ve got you covered with a small business newsletter. This weekly newsletter will talk about a different subject related to websites and small businesses each week, as well as highlight blog posts that can help you out. This will help you optimize your business’ site as much as you can while you get yourself into a position to take the next step for your website.
"*" indicates required fields
Seeing other issues
Finally, you can start to see a bunch of different issues with your website as well inside of Google Search Console. A lot of these things are either pretty new or still in a testing state, so things might change or be wrong, but they can really give you a good look into what you can do to fix your website.
You’ll be able to see these towards the bottom of the left-hand menu underneath “Enhancements”.
The first one, Speed, is still in the experimental phase, but gives you an idea of how many pages have moderately fast or slow page speed. Speed does play a factor in your page ranking and whether or not people stay on your website, so as this gets better, it might be a good idea to check on it and see what you can fix.
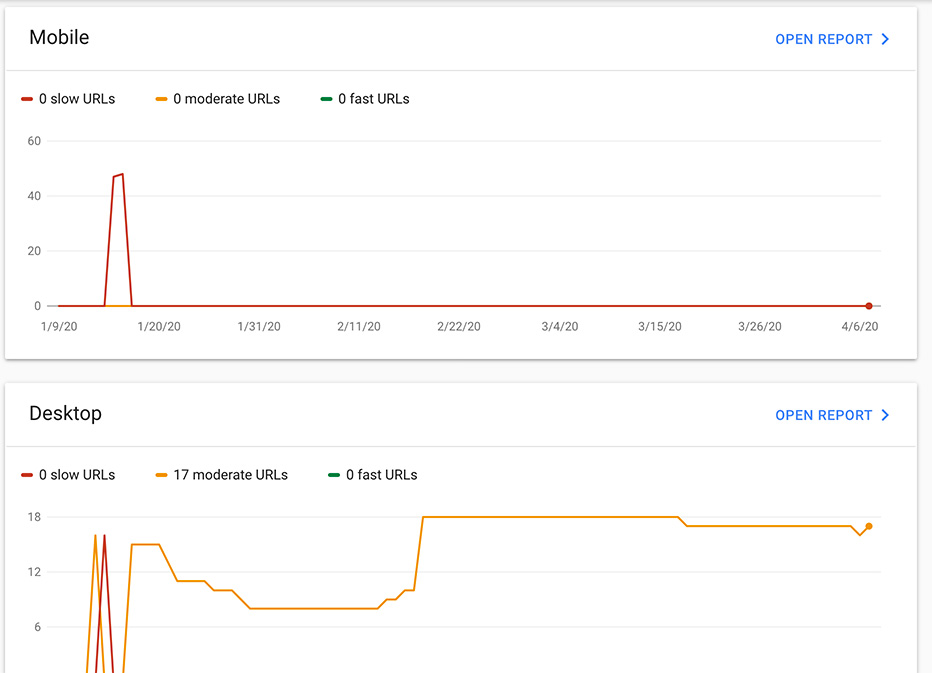
Next, Mobile Usability allows you to see if there are any mobile-specific issues on your website. These are things like clickable elements being too close (which makes it easy to click the wrong thing) and content being wider than the screen, so the user has to scroll horizontally.
FAQs, Products and Video all have to do with making sure your markup and Schema are correct for those pages so that they show up correctly in the different ways Google can show results.
And finally, Sitelinks searchbox has to do with pages and their compatibility with the Sitelinks searchbox feature that can be shown in Google search results.
Conclusion
So there you have it. That is a quick look around your Google Search Console account. There is a lot here, and you can spend days looking at it all. So take some time to do that. Make sure your sitemap is submitted. Check and fix errors. And take a look at the stats and see how they progress over time.
It’s a powerful tool if you use it correctly.



One response to “A look around your Google Search console account”
Right, also used to index url and inspections. Google search console is one of the best tool which provides all the in depth knowledge like where is the improvement can be done in keywords.