
Google Tag Manager is a wonderful tool to get analytics and insight into your website’s performance.
But getting started with it can be a bit tricky. It’s not like Google Analytics and Google Search Console where you just plug in a few things and then you can just let it run. Things can get complicated quickly and, before you know it, you’re in over your head with it.
So today let’s go through five tags you should create inside of your Google Tag Manager to help you get better analytic data and to walk you through how to create tags inside of GTM.
And before we get started, I do want to throw in one caveat and that is I’m working under the assumption that you’ve already got Google Tag Manager set up for your site. If you don’t I highly recommend that you do before beginning.
1. Basic Google Analytics tag
Let’s start with the most basic (and easiest) tag you can make in Google Tag Manager: a Google Analytics tag. With this tag, you no longer need to worry about that pesky tracking code from Analytics. Instead, if you have this tag deployed, all you need to do is have the Tag Manager code on your site.
Before we start though, we need to create a custom variable for our Google Analytics ID. This will make it much easier to use the ID, since a lot of the tags you’ll use involve Google Analytics in some way.
To create a custom variable, go to “Variables” in the left-hand column and go down to “User-Defined Variables” and hit “New”. Then select a variable type and pick “Google Analytics Settings”. Then enter in your Tracking ID, hit save and then name the variable.
With that out of the way, go to “Tags” and hit “New”. For Tag Configuration, select “Google Analytics: Universal Analytics”. In the new settings that pops up, select “Page View” and then select the custom variable we just created for the Google Analytics ID.
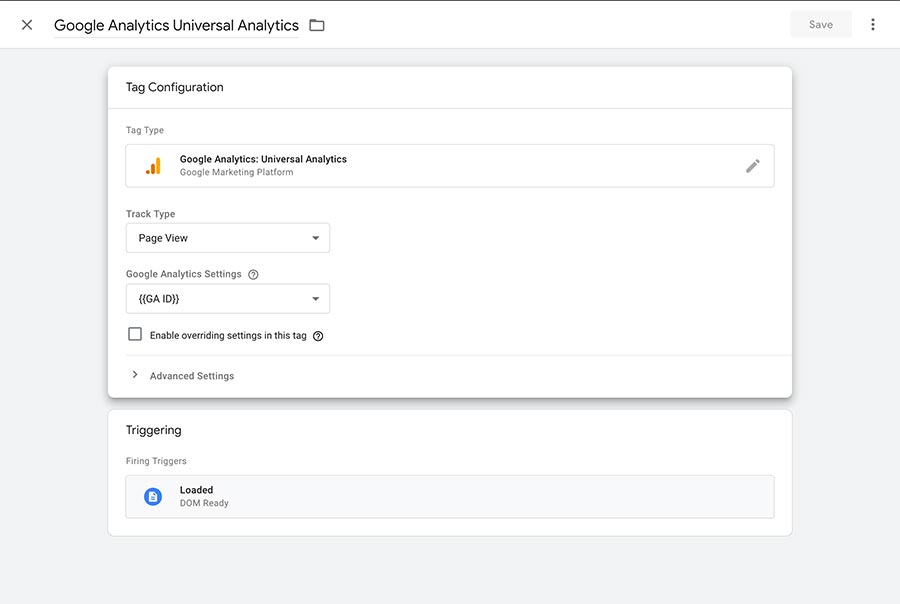
Then we need to select a trigger. For this, we’ll use the “Page View” trigger. This means that this tag will fire and send a response to Google Analytics for every page view.
But we’re not quite done yet. We need to hit save on everything. This takes us back out to the main screen. Now we need to publish our changes. So hit “Submit” in the top right corner of the page and then work your way to through the subsequent screens until you’ve reached the versions screen. Now you’ve published your first tag to your website.
Get Google Tag Manager Managed for You
Do you want to use Google Tag Manager, but aren’t able to set it up and create tags yourself? No worries! The Performance plan of the WordPress Website Care plans can take care of that for you. You’ll get GTM set up and all of the tags you want created. Plus, you’ll get Google Analytics reporting and Google Search Console set up for you. And it all comes on top of quality and secured hosting, managed updates and so much more.
Let’s Give Your Website the Care it Deserves2. Internal link tracking
Another tag that I like to have is internal link tracking. This allows you to see what internal pages are being clicked on and from what page. It’s a pretty rudimentary way to piece together a flow chart of traffic.
But in order to do this, we first need to add in a built-in variable. To do that, we go back to “Variables” and then hit “Configure” in the first section. Then check “Click URL” and “Page URL”.
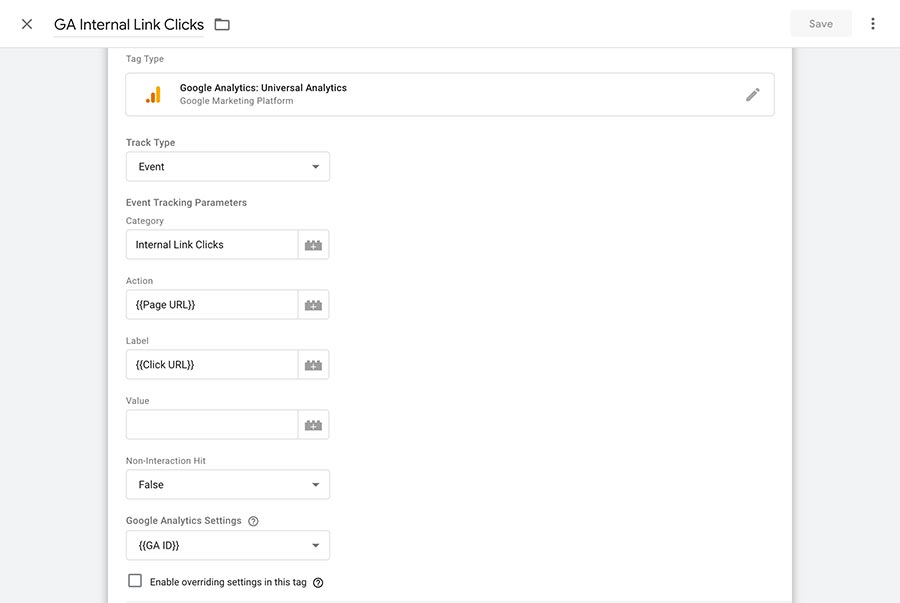
Now we go back to “Tags” and add in a new tag. For this, we’ll once again select “Google Analytics: Universal Analytics” but our track type is going to be an event. Our category will be “Internal Link Clicks” (which is how we will find it in Google Analytics). The action is {{Page URL}} and the label is {{Click URL}}.
Now we need to add in a trigger. For this, we’ll use “Click – Just Links” and then select that this trigger will fire on some link clicks. And then we’ll make sure that the Click URL contains our domain (like jacobmartella.com).
Then hit save all the way back through, name the tag and then publish your changes. If you have steady traffic to your website, you should start to see the “Internal Link Clicks” event category inside your Google Analytics data starting tomorrow.
3. Scroll depth tracking
Another really good tag to have on your website is tracking scroll depth. This allows you to see how far people are scrolling down your web pages, and you can use that to guesstimate which pages are attracting people to read all the way through and which pages aren’t.
To set up the scroll depth tag, we’ll need to go back to the variables and configure the “Scroll Depth Threshold”, “Scroll Depth Units” and “Scroll Direction” variables (located under Scrolling).
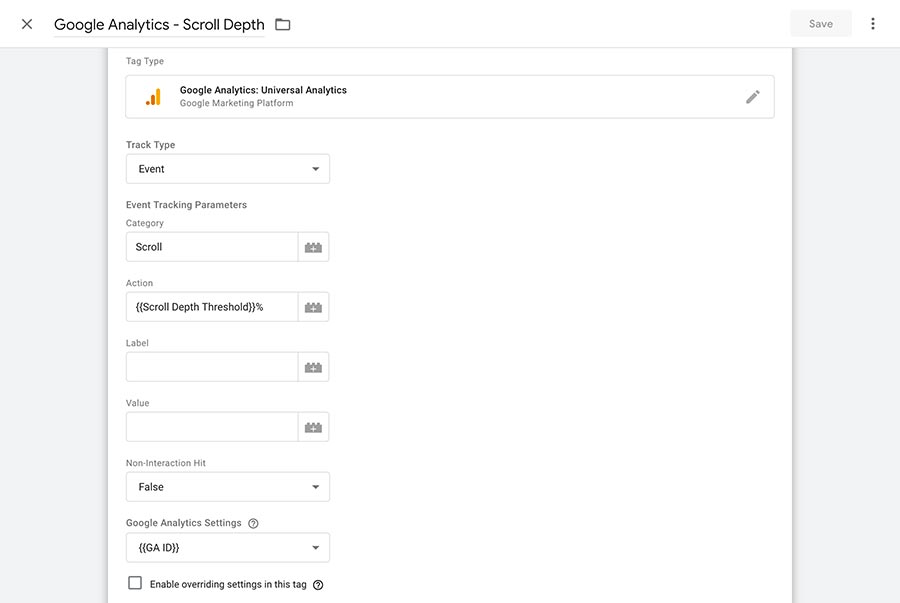
Once that’s done, go back to “Tags” and add in a new tag. We’ll again use the “Google Analytics: Universal Analytics” tag and select “Event” as the track type. We’ll enter our category as “Scroll” and then put in {{Scroll Depth Threshold}}% as our action, leaving the label blank.
For our trigger we’ll use the “Scroll Depth” trigger and track the vertical scroll depth. I use percentages and enter them in by 10s, but you can do whatever you feel like with the actual numbers. Then hit save all the way back out and then publish your changes. Tomorrow in your Google Analytics, you should see a Scroll Depth event category in the events report.
Get Insights on How to do a Small Business Website Right!
Are you looking to get some help with your small business’ website, but aren’t quite in a spot to take that next step? No worries! I’ve got you covered with a small business newsletter. This weekly newsletter will talk about a different subject related to websites and small businesses each week, as well as highlight blog posts that can help you out. This will help you optimize your business’ site as much as you can while you get yourself into a position to take the next step for your website.
"*" indicates required fields
4. Video play length
Finally, if you show off your own YouTube videos on your website, you might be interested in seeing how many people play them and how long they stick around. And you can do that with Google Tag Manager.
First, we’ll need to configure the “Video Current Time”, “Video Duration”, “Video Percent”, “Video Provider”, “Video Status”, “Video Title”, “Video URL” and “Video Visible” variables. Once that’s taken care of we’ll need to create our own custom JavaScript variable. In the “User-Defined Variables” section, create a new variable and select “Custom JavaScript”. Then place the following lines of code.
function() {
    var status = {{Video Status}};
    switch (status) {
        case 'start':
            return 'Start playing';
        case 'pause':
            return 'Pause';
        case 'buffering':
            return 'Buffering';
        case 'progress':
            return 'Reached ' + {{Video Percent}} + '%';
        case 'complete':
            return 'Reached the end';
    }
}
Once again we’ll be using the “Google Analytics: Universal Analytics” with an event as the track type. I’ve made my category “YouTube”, but you can call it what works best for you. The action will be the name of the custom variable we just created and then the label can be {{Video Title}} (and the URL if you want to know which page it was played from).
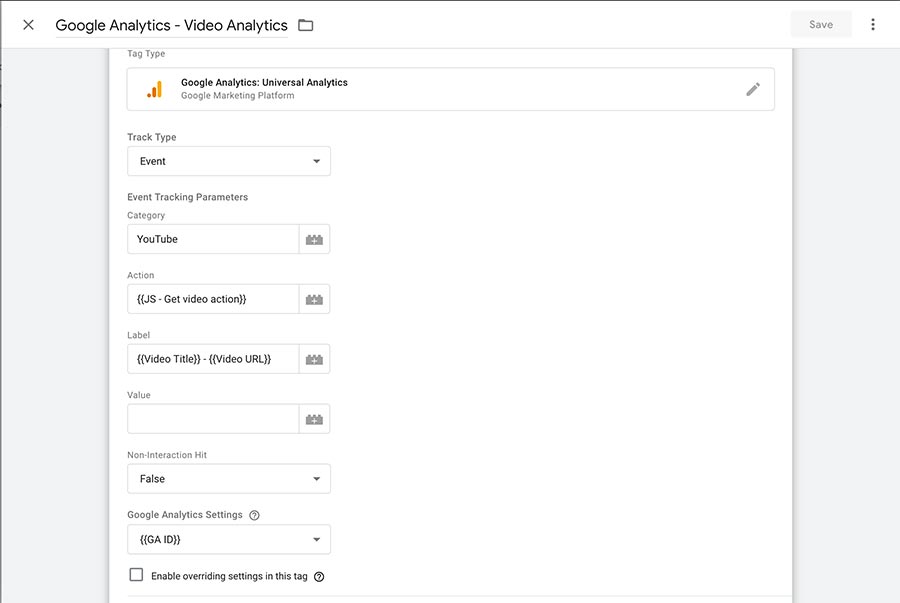
For our trigger, we’ll select the YouTube Video trigger. You can choose to capture how many times a video is started, completed and how far along someone gets in a video either as a percentage or time-based. Then save your way out and publish your changes. Now if someone plays a video on your site, you should see this event in your Google Analytics events report.
So there you have it. Those are five tags you can create right away to get started with Google Tag Manager and really tracking your website’s analytics in an in-depth way. You can still get very complicated with your tags and the data you can gleen, but these tags will be a great jumping off point for your efforts.